#A beginner’s guide to web scraping with Python and Scrapy
Table of Contents
“#A beginner’s guide to web scraping with Python and Scrapy”
Since their inception, websites are used to share information. Whether it is a Wikipedia article, YouTube channel, Instagram account, or a Twitter handle. They all are packed with interesting data that is available for everyone with access to the internet and a web browser.
But, what if we want to get any specific data programmatically?
There are two ways to do that:
Using official API
Web Scraping
The concept of API (Application Programming Interface) was introduced to exchange data between different systems in a standard way. But, most of the time, website owners don’t provide any API. In that case, we are only left with the possibility to extract the data using web scraping.
Basically, every web page is returned from the server in an HTML format, meaning that our actual data is nicely packed inside HTML elements. It makes the whole process of retrieving specific data very easy and straightforward.
This tutorial will be an ultimate guide for you to learn web scraping using Python programming language. At first, I’ll walk you through some basic examples to make you familiar with web scraping. Later on, we’ll use that knowledge to extract data of football matches from Livescore.cz .
[Read: Neural’s market outlook for artificial intelligence in 2021 and beyond]
Getting Started
To get us started, you will need to start a new Python3 project with and install Scrapy (a web scraping and web crawling library for Python). I’m using pipenv for this tutorial, but you can use pip and venv, or conda.
pipenv install scrapy
At this point, you have Scrapy, but you still need to create a new web scraping project, and for that scrapy provides us with a command line that does the work for us.
Let’s now create a new project named web_scraper by using the scrapy cli.
If you are using pipenv like me, use:
pipenv run scrapy startproject web_scraper .
Otherwise, from your virtual environment, use:
scrapy startproject web_scraper .
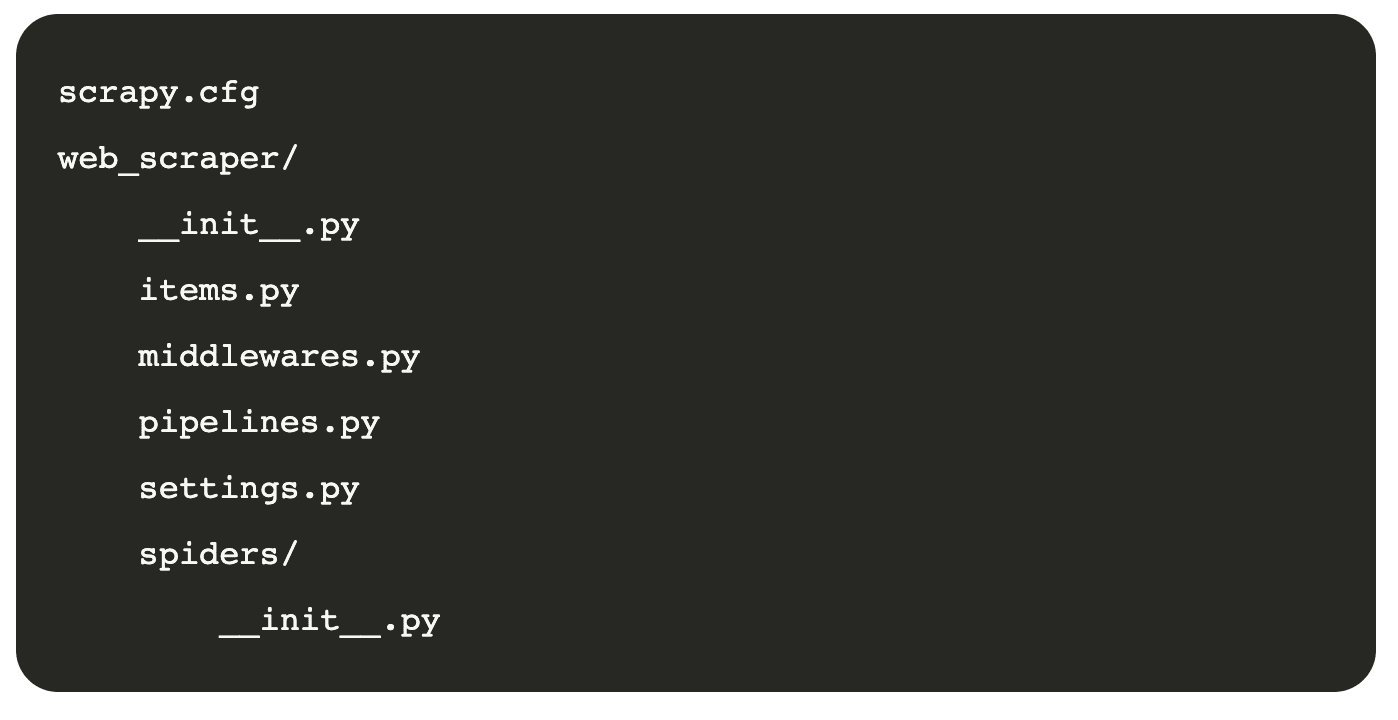
This will create a basic project in the current directory with the following structure:
Building our first Spider with XPath queries
We will start our web scraping tutorial with a very simple example. At first, we’ll locate the logo of theLive Code Streamwebsite inside HTML. And as we know, it is just a text and not an image, so we’ll simply extract this text.
The code
To get started we need to create a new spider for this project. We can do that by either creating a new file or using the CLI.
Since we know already the code we need we will create a new Python file on this path/web_scraper/spiders/live_code_stream.py
Here are the contents of this file.
Code explanation:
First of all, we imported the Scrapy library because we need its functionality to create a Python web spider. This spider will then be used to crawl the specified website and extract useful information from it.
We created a class and named it LiveCodeStreamSpider. Basically, it inherits from scrapy.Spider and that’s why we passed it as a parameter.
Now, an important step is to define a unique name for your spider using a variable called name. Remember that you are not allowed to use the name of an existing spider. Similarly, you can not use this name to create new spiders. It must be unique throughout this project.
After that, we passed the website URL using the start_urls list.
Finally, create a method called parse() that will locate the logo inside HTML code and extract its text. In Scrapy, there are two methods to find HTML elements inside source code. These are mentioned below.
CSS
XPath
You can even use some external libraries like BeautifulSoup and lxml . But, for this example, we’ve used XPath. A quick way to determine the XPath of any HTML element is to open it inside the Chrome DevTools. Now, simply right-click on the HTML code of that element, hover the mouse cursor over “Copy” inside the popup menu that just appeared. Finally, click the “Copy XPath” menu item.
Have a look at the below screenshot to understand it better.
Find XPath using Chrome Dev Tools
By the way, I used/text()after the actual XPath of the element to only retrieve the text from that element instead of the full element code.
Note:You’re not allowed to use any other name for the variable, list, or function as mentioned above. These names are pre-defined in Scrapy library. So, you must use them as it is. Otherwise, the program will not work as intended.
Run the Spider:
As we are already inside theweb_scraperfolder in command prompt. Let’s execute our spider and fill the result inside a new filelcs.jsonusing the below code. Yes, the result we get will be well-structured using JSON format.
pipenv run scrapy crawl lcs -o lcs.json
scrapy crawl lcs -o lcs.json
Results:
When the above code executes, we’ll see a new filelcs.jsonin our project folder.
Here are the contents of this file.
[
{"logo": "Live Code Stream"}
]
Another Spider with CSS query selectors
Most of us love sports, and when it comes to Football, it is my personal favorite.
Football tournaments are organized frequently throughout the world. There are several websites that provide a live feed of match results while they are being played. But, most of these websites don’t offer any official API.
In turn, it creates an opportunity for us to use our web scraping skills and extract meaningful information by directly scraping their website.
For example, let’s have a look atLivescore.czwebsite.
On their home page, they have nicely displayed tournaments and their matches that will be played today (the date when you visit the website).
We can retrieve information like:
Tournament Name
Match Time
Team 1 Name (e.g. Country, Football Club, etc.)
Team 1 Goals
Team 2 Name (e.g. Country, Football Club, etc.)
Team 2 Goals
etc.
In our code example, we will be extracting tournament names that have matches today.
The code
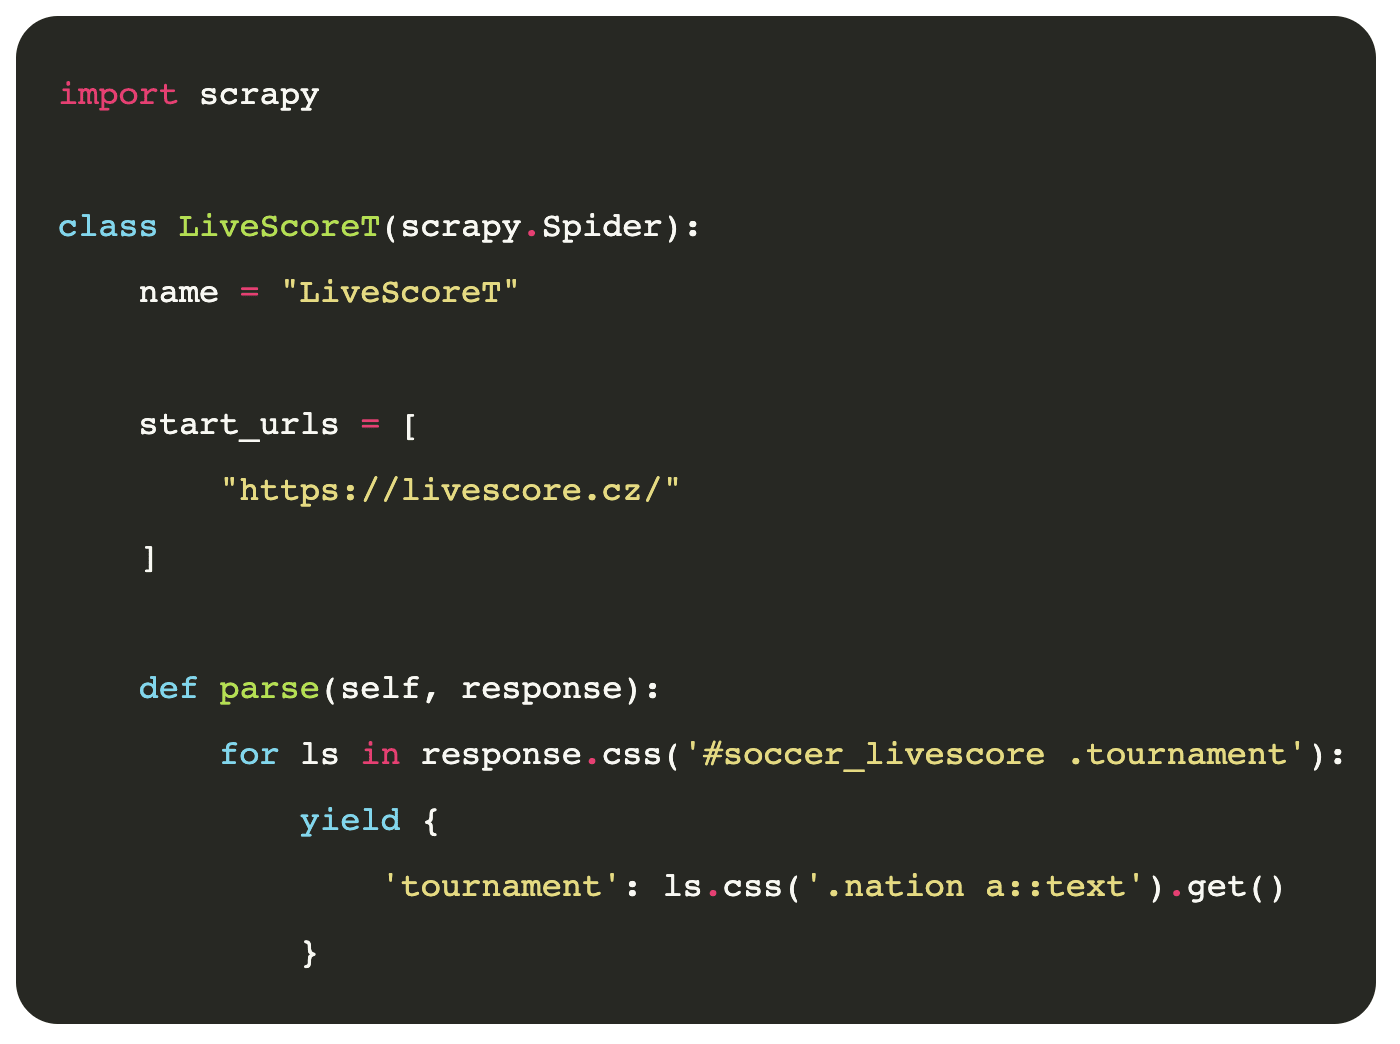
Let’s create a new spider in our project to retrieve the tournament names. I’ll name this file aslivescore_t.py
Here is the code that you need to enter inside/web_scraper/web_scraper/spiders/livescore_t.py
Code explanation:
As usual, import Scrapy.
Create a class that inherits the properties and functionality ofscrapy.Spider.
Give a unique name to our spider. Here, I usedLiveScoreTas we will only be extracting the tournament names.
The next step is to provide the URL of Livescore.cz.
At last, theparse()function loop through all the matched elements that contains thetournament nameand join it together usingyield. Finally, we receive all the tournament names that have matches today. A point to be noted is that this time I usedCSSselector instead ofXPath.
Run the newly created spider:
It’s time to see our spider in action. Run the below command to let the spider crawl the home page of Livescore.cz website. The web scraping result will then be added inside a new file calledls_t.jsonin JSON format.
pipenv run scrapy crawl LiveScoreT -o ls_t.json
By now you know the drill.
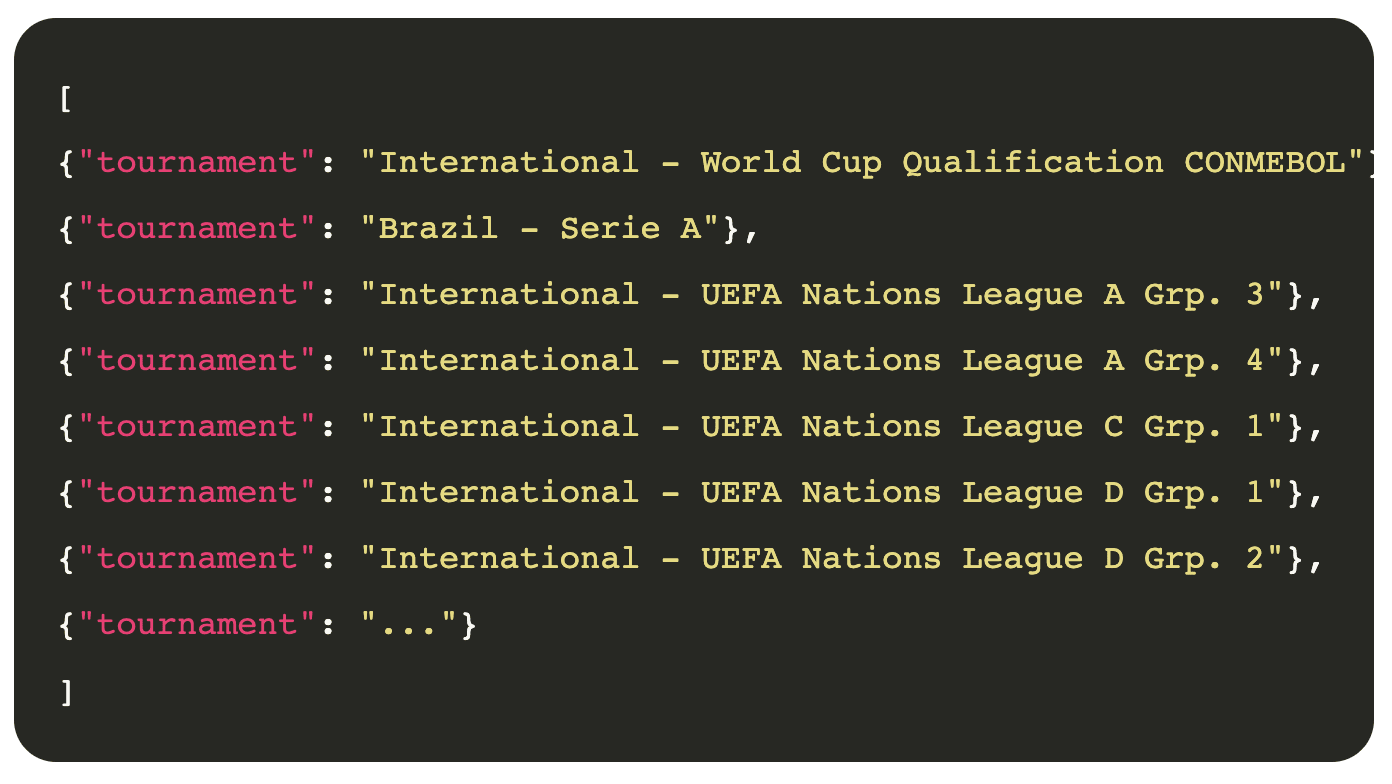
Results:
This is what our web spider has extracted on 18 November 2020 fromLivescore.cz. Remember that the output may change every day.
A more advanced use case
In this section, instead of just retrieving the tournament name, we will go the next mile and get complete details of tournaments and their matches.
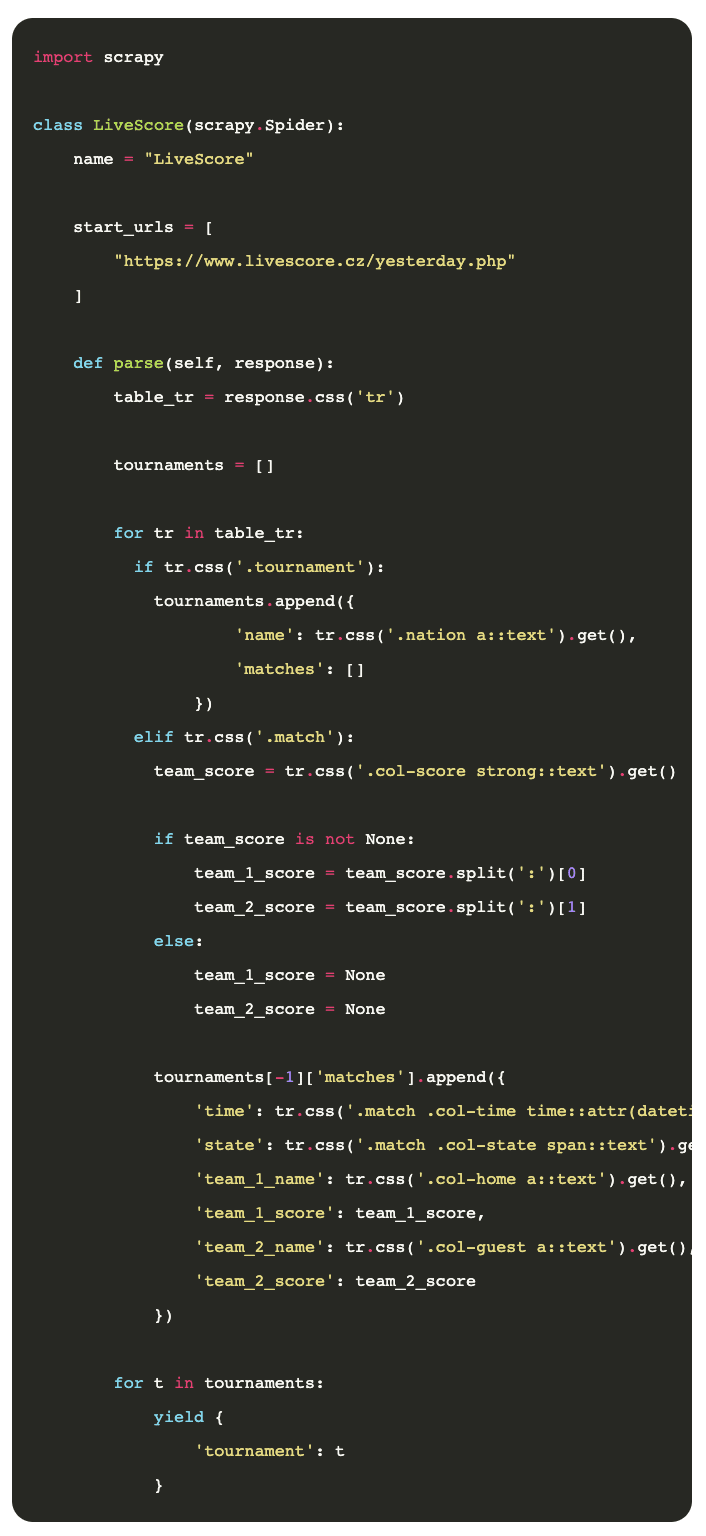
Create a new file inside/web_scraper/web_scraper/spiders/and name it aslivescore.py. Now, enter the below code in it.
Code explanation:
The code structure of this file is the same as our previous examples. Here, we just updated theparse()method with a new functionality.
Basically, we extracted all the HTML<tr></tr>elements from the page. Then, we loop through them to find out whether it is a tournament or a match. If it is a tournament, we extracted its name. In the case of a match, we extracted its “time,” “state,” and “name and score of both teams.”
Run the example:
Type the following command inside the console and execute it.
pipenv run scrapy crawl LiveScore -o ls.json
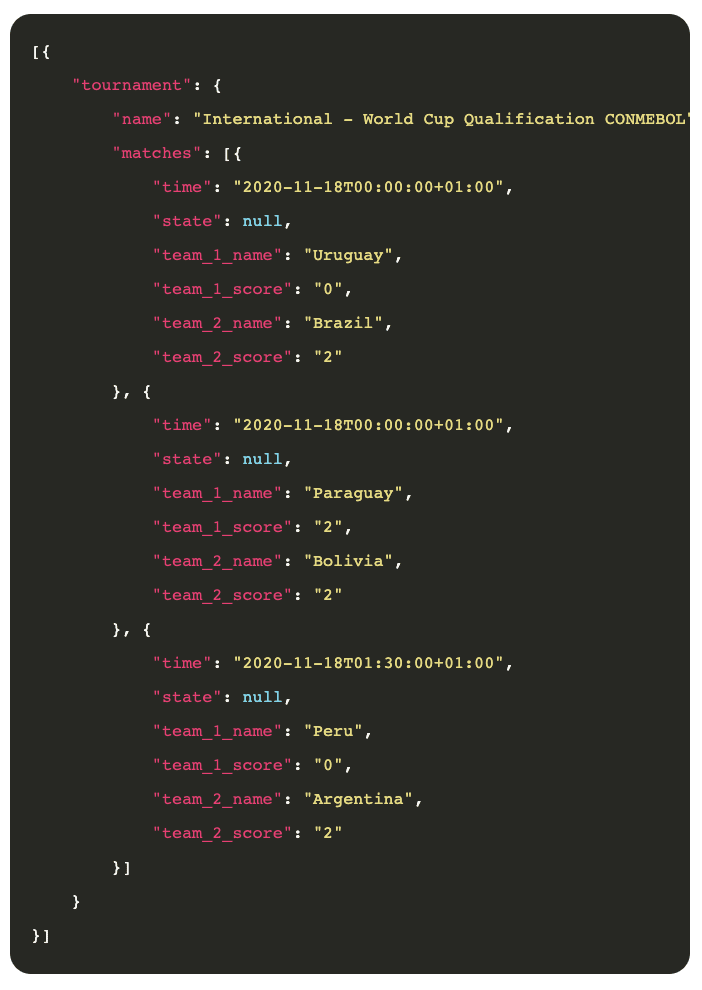
Results:
Here is a sample of what has been retrieved:
Now with this data, we can do anything we want, like use it to train our own neural network to predict future games.
Conclusion
Data Analysts often useweb scrapingbecause it helps them in collecting data to predict the future. Similarly, businesses use it to extract emails from web pages as it is an effective way of lead generation. We can even use it to monitor the prices of products.
In other words, web scraping has many use cases andPythonis completely capable to do that.
So, what are you waiting for? Try scraping your favorite websites now.
Live Code Stream is also available as a free weekly newsletter. Sign up for updates on everything related to programming, AI, and computer science in general.
If you liked the article, do not forget to share it with your friends. Follow us on Google News too, click on the star and choose us from your favorites.