#How to Resize or Reduce Photo Size on iPhone and iPad
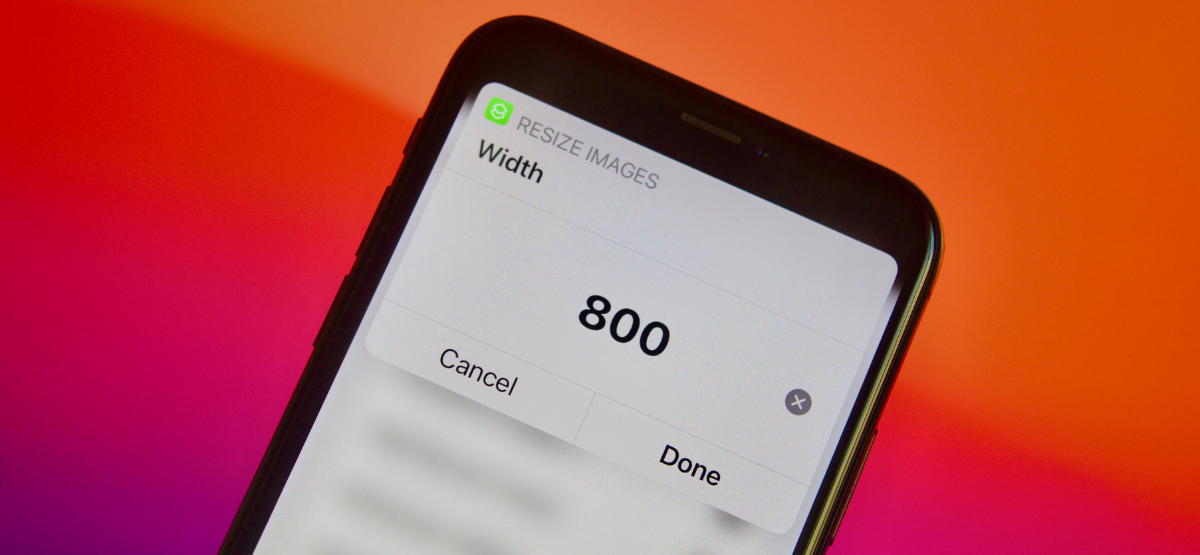
Table of Contents
“#How to Resize or Reduce Photo Size on iPhone and iPad”

The editor in the Photos app is quite feature-rich, but you can’t resize photos. Luckily, you can use a shortcut or a third-party app to resize or reduce photo size on iPhone and iPad. Here’s how.
How to Resize a Photo Using Shortcuts
If you need to reduce a photo’s resolution or file size, look no further than the Shortcuts app. Shortcuts is Apple’s built-in automation tool that helps you create your own tools and simplify multi-step processes that you perform frequently.
Using Shortcuts, you can create simple automations that follow predefined steps. In this guide, we’ll create a shortcut that can take single or multiple photos, resize them based on your input, and save the resulting output back to the Photos app.
To get started, open the Shortcuts app on your iPhone or iPad. In the “My Shortcuts” tab, tap the Plus (“+”) button in the top-right corner to create a new shortcut.

Tap the “Add Action” button.

Search for and then add the “Resize Image” action.

Now it’s time to customize this action. Tap the “Image” button.

In the pop-up, choose the “Shortcut Input” option. This means that the shortcut will resize any image that you send to it (It’s useful for sending multiple images using the Share menu in the Photos app.).

Next, it’s time to decide the resulting width and height. By default, the shortcut will resize the image to 640 pixels wide with auto height.

You can tap the “640” button to change the default, or you can switch to the “Ask Each Time” option. This would be our recommendation, as it gives you the freedom to change the resolution without duplicating the shortcut.

It’s best to leave the “Auto Height” option as the default. Next, tap the Plus(+) button to add the next action.

Search for and then add the “Save to Photo Album” action.

By default, this action will save the resized image to the “Recents” album. If you want, you can tap the “Recents” button to change the album.

The shortcut is now created. Tap the “Menu” button to customize it.

Here, give the shortcut a name at the top, and then be sure to enable the “Show in Share Sheet” option.

Tap the “Done” button at the top to save the customization.

On the shortcut screen, tap the “Done” button again to save the shortcut.

You’re all done in the Shortcuts app. Next, launch Photos on your iPhone or iPad.
In Photos, select a photo (or the photos) that you want to resize and tap the “Share” button (which looks like a rounded square with an arrow pointing upward from it).

Scroll down and select the shortcut that we just created (in our example, it’s called “Resize Images,” but you might have named it something different in the Shortcuts app above).

Enter the desired image width in pixels and tap the “Done” button.

After a moment, the shortcut will resize the image (or images), and you’ll find it (or them) saved in the “Recents” album in the Photos app.
You can now share the resized images to your Mac or use them in any app or website that you want.
RELATED: How to Instantly Share Files with AirDrop on iPhone, iPad, and Mac
How to Resize a Photo Using a Third-Party App
While Shortcuts can be a great tool for power users (A single shortcut can save you a lot of time if you’re going to be resizing images often.), taking the time to create the shortcut can feel like overkill if you only want to resize a few photos every now and then.
This is where you can find comfort in the free Image Size app. The application has a very simple resize tool that helps you change the resolution and reduce the photo size as well.
To get started, download the Image Size app from the App Store. After opening the app, tap the Photos button in the top-left corner.

The app will ask you for access to your photo library. You can give the app access to your entire photo library, or you can select just a few photos.

Once you allow access, go through your library and select the image that you want to resize.

In the image preview, tap the “Choose” button.

You will now see the image in the editor. In the “Pixel” section, change the “Width” or the “Height” to resize the image (Make sure that the button in the middle that looks like a chain link is enabled so that the aspect ratio remains the same.).

The app will show the file size of the new, resized image. Once you’re happy, tap the save button (that looks like a downward-pointing arrow with a line beneath it) in the toolbar at the bottom of the screen.

The app will save the resized image in the “Recents” folder in the Photos app. You can repeat this process to resize as many photos as you’d like.
On a Mac? You can resize a photo in a couple of seconds using the built-in Preview app.
RELATED: How to Resize or Reduce Photo Size on Mac
If you liked the article, do not forget to share it with your friends. Follow us on Google News too, click on the star and choose us from your favorites.
For forums sites go to Forum.BuradaBiliyorum.Com
If you want to read more like this article, you can visit our Technology category.