#Crunchyroll – Mitrasphere Beginner’s Guide

“#Crunchyroll – Mitrasphere Beginner’s Guide”

- Part 1
- Starting Your Journey (0 – 1,000 CP)
- Advancing the Story (1,000 – 15,000 CP)
- Part 2
- Traveling to Hard Mode and Beyond (15,000+ CP)
- Core Combat Mechanics
- Bonus! Nekia Item Exchange
1. Clearing Hard to Unlock Expert
Now that you’re more familiar with Mitrasphere and powering up, you might start to lay your eyes on higher-difficulty content. With that in mind, you should definitely take a look at Expert stages. These are boss fights you can find in almost every story chapter, with an emphasis on cooperating with other players and setting up a balanced team.
Unlocking access to them simply requires you to clear the Hard stages of their chapter.
Do not despair, for Hard Mode is actually not particularly difficult. It functions exactly like Normal Mode and can be cleared solo. However, it requires a higher and increasing amount of CP to access, starting with 15,000 CP for Chapter 1 Hard.
2. Limit Breaking Gear
If you have already spent quite some time farming seeds, it may feel progressively more difficult for you to gain additional CP as you’ve maxed out your gear. The initial maximum level of equipment depends on its rarity: Lvl. 20 for 1-star items, Lvl. 30 for 2-star, Lvl. 40 for 3-star, and Lvl. 50 for 4-star.
Every item, no matter its rarity, can be limit broken 4 times to increase its maximum level by 5 per limit break, meaning 4-star items can reach a maximum level of 70. It can also be interesting to note that a fully upgraded 3-star item will reach Lvl. 60 and thus might give more stats than a standard Lvl. 50 4-star equipment. To reward you for sacrificing items, levels above the initial cap grant a higher amount of stats compared to base levels.
There are two ways to limit break items, which mostly depend on what gear is available to you.
The first method is to use perfect duplicates of your items (same element and rarity) to immediately limit break your item once, increasing its level cap. Using a perfect duplicate also allows you to limit break the maximum skill level of an item, up to skill level 9.
The second method is to use duplicates with a lower rarity. Each lower tier of rarity gives a fifth of the experience needed to level the item, so consuming a 3-star equip to limit break its 4-star equivalent will grant you 20% towards its next limit break. You will earn 4% if the item is 2 tiers below and 0.8% for 3 tiers below. This allows you to slowly limit break your gear even with common drops. However, you will not be able to raise the maximum cap of your skill level using lower-rarity duplicates.
Please note that 4-star rainbow equips do not have lower rarity equivalents, and thus rely on perfect duplicates to be limit broken. These items are however often very interesting even without any limit breaks due to their Command and Passive Skills.
Jumping into Expert content will give you a new perspective on the game. Also, you might get your butt kicked by a fairly angry boss. This part is all about reminding you of a few core combat mechanics that you might have forgotten, even though they are briefly presented during the initial tutorial.
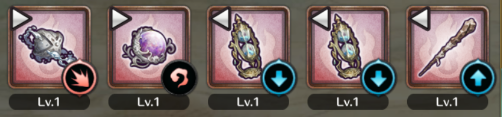
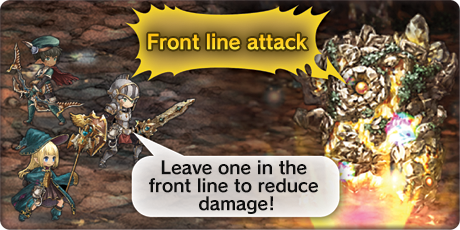
1. Moving Between Rear and Front Rows
Every weapon displays a small triangle/arrow icon indicating if using this attack will move you to the front or back row of the arena. You do not need to already be in that position to use the attack; it will simply move you to it if you are not already there.
The most important thing about combat lanes is related to mitigating incoming damage: any player in the rear row will take half damage from every direct damage source (everything except poison damage and similar status conditions basically).
As Expert fights often include abilities dealing high damage to everyone in the party, staying in the rear row when such an attack is being prepared by the boss will be helpful or even necessary to survive. Remember that dead people do not deal damage, and that resurrecting dead teammates is not always possible for your Cleric.
2. 4-Second Global Cooldown
Every time you use a weapon skill, you cannot use another for the following four seconds, which we call a “Global Cooldown” or “GCD.” It allows for consistently-paced tactical combat, rather than a reliance on pure reflexes or button-mashing.

Defensively speaking, it also means you are “locked” into your current lane for the next four seconds after using an attack. If you recognize that the boss is about to use a powerful move, it it may be dangerous to use an attack that will move you to the front.
3. Elemental Advantages and Disadvantages
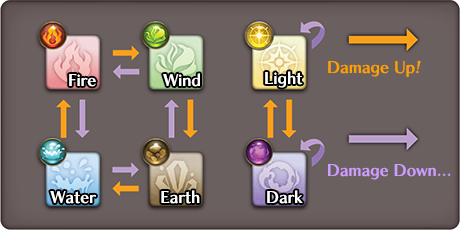
Mitrasphere includes elemental advantages and disadvantages, and while you may choose to ignore them during the early stages of the game, it is something to keep in mind as it will give you an edge in tougher battles.
Attacking an enemy with a weapon that is strong against the enemy’s element (for example, a water against fire) will apply a +30% damage multiplier. On the flip side, the opposite will apply a -30% damage multiplier, significantly reducing your damage.
It is recommended to keep lower-rarity weapons of different elements for your main Job, even if its level and skill levels are lower, as it may still result in a damage increase against a particular monster.
Keep in mind that this also applies to damage taken. Your equipped armor and accessories, including pieces in your support slots, will grant you elemental resistance or lower your resistance up to 30% if everything is of the same element.
4. Buffs and Debuffs
You will notice that every Job has weapons dealing damage and weapons applying beneficial effects (or “buffs”) to themselves or their whole party. This is another reason why having a balanced party is typically the best strategy, as more support-oriented roles like the Archer are still particularly useful, even though their damage is lower than a Swordsman or a Mage.
It is generally more efficient to buff yourself then follow up with a devastating attack than to do two low-damage consecutive attacks. It is especially true when the Dragonkin Gauge comes into play. Activating your Dragonkin typically multiplies a weapon’s damage by three. Stacking your buffs then unleashing a Dragonkin attack will turn many problems into dust.
You will also notice that every buff or debuff is followed by a letter (e.g. Physical Damage Dealt UP (10%) (A)). This letter explains how this particular effect interacts with other effects.
Effects of the same nature (e.g. Physical Damage Dealt UP) with a different letter will stack; in other words, they will both be applied for their respective duration.
For example, applying Physical Damage Dealt UP (20%) (A) and Physical Damage Dealt UP (50%) (B) means that every attack you do while both buffs remain active will benefit from 70% extra damage.
Effects of the same nature with an identical letter will not stack. When you apply the second, you will keep the stronger buff and refresh its duration with the second effect’s duration.
For example, applying Physical Damage Dealt UP (50%) (7.9s) (A) then Physical Damage UP (10%) (24s) (A) means that every attack you do in the next 24 seconds will benefit from 50% extra damage. As long as the buff doesn’t expire, you just need to reapply the second buff to benefit from the stronger effect of the first
Finally, please remember that you can check what kind of effects affect a character (be it you, an ally, or an enemy) during a fight by pressing and holding your finger over the character.
5. Understanding Common Concepts in Boss Battles
There are various forms of boss battles in Mitrasphere, spanning across Grand Battles, Extra Battles, Expert boss battles, and more to come. When challenging the more difficult levels of bosses, you’ll come faced with various interesting game mechanics. Most bosses have an assortment of abilities that are fun to experience when you come face to face with them for the first time, but they also have more common attacks that can be categorized into the following:
a. Tank Busters
“Tank Busters” in MMO terminology refer to particularly strong single-target attacks that are meant to be absorbed by the most durable character of the group, which will be the Guardian in Mitrasphere. The Guardian’s damage mitigation buffs and more defensively-oriented stats will allow them to survive these hits, while other Jobs would likely be severely hurt or killed on impact. It is paramount for the party’s Guardian to have his mitigation buffs on and retain the boss’s attention (or aggro) when this attack happens.
b. Raid Busters
“Raid Busters” refer to party-wide attacks that are meant to be soaked in by the entire group. These attacks target everyone in the party no matter the circumstances. They will typically deal less damage if damage reduction debuffs are applied to the boss, if the party stands in the rear row and/or applies damage mitigation buffs, or may be completely negated if you increase your evasion or reduce the boss’s accuracy to force a lucky miss.
c. Cleaves
“Cleaves” or “row attacks” refer to attacks dealing damage to an entire row, (most commonly the front row. They are often as powerful as tank busters but may hit multiple players if they stand in the harm’s war when the attack lands. As they deal very high damage but are easily avoidable, it is important for non-Guardians to move to the rear row to avoid getting killed. However, contrary to tank busters, at least one person should stay in the hit lane, preferably the party’s Guardian, as the attack will always hit at least one person. If everyone is in the rear row when a cleave lands, everyone will be hit.
d. Other Common Mechanics
Most boss fights include a few specific mechanics that differ from the usual array of attacks presented above. Identifying them and learning how to deal with them is part of the fun of any RPG. However, below are a few mechanics that are still relatively common.
Buffs and Debuffs: Enemies also have access to abilities increasing their power or decreasing yours. Some of these have a short duration, increasing the potency of their next move, while others can last the whole fight.
Damage On Action: Some enemies can apply poison or other similar status conditions on one or several targets. These skills are listed as debuffs and deal damage every time you use a skill based on a percentage of your maximum health. Some weapons that players can acquire can also apply poison. While most bosses are immune to it, it can be devastating on anyone that is affected by it.
Guts: Some enemies benefit from a specific buff called “Guts.” Guts allow them to resist lethal damage. If an attack is meant to drop their health to 0, they will instead survive with 1 health point and lose one stack of Guts, assuming they have more than one. Guts can also be applied to a player, although it is a relatively rare effect at the current juncture.
e. Meeting Players to Tackle Boss Fights
You cannot clear difficult boss stages by yourself even with the best equipment and mechanics in mind. At this point, you’ll need to find other like-minded players to group with. You have a few tools at your disposal for this.
First, try joining a battle in progress.This works best for content currently being challenged by many players. To check if there is a team with an open slot fighting your desired stage, simply choose “Coop” instead of “Start” after selecting a stage. Active teams with open slots will be displayed here.
Second, recruiting in the World Chat via the General or Recruit tab. For more efficient communication, it is recommended to state your Job and targeted content (e.g. “Cleric LFG Chapter 2 EX”) as there are many ongoing battles in the game and a balanced group is generally more efficient.
Third, you can use the Groups feature to communicate more easily with players you want to play with regularly. Groups are persistent chat rooms that you can join or create and may also serve as a substitute for guilds. Every player may be a part of more than one Group.
Finally, you can find fellow players on your usual social networks such as Discord. Don’t hesitate to try to set up activities yourself as many players are waiting for an open slot in a group!
1. Nekia Item Exchange
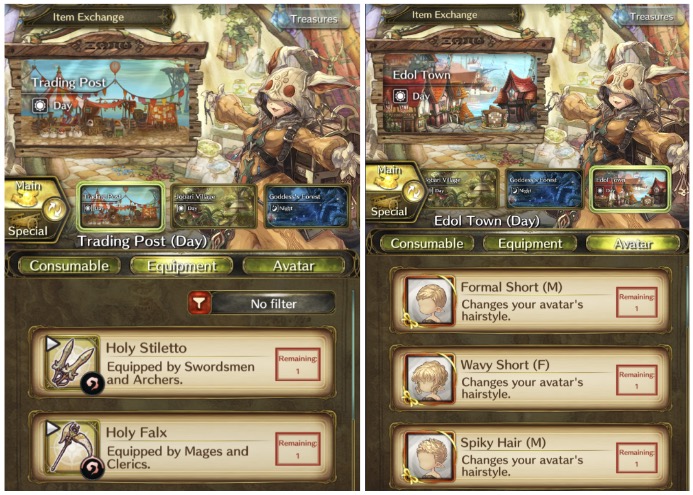
The Nekia Item Exchange contains a lot of goodies! You can acquire items such as new weapons, avatar pieces, and even voices. There is also a healthy amount of Sea Crystals to obtain as well as 4-star rainbow accessories! Please check the Nekia Item Exchange regularly as new items may be added with the release of new content.
You may redeem Pearls for items in the exchange, which can be found via the shiny Search spots.
You may also redeem Nekia Medals for items. Nekia Medals can currently be obtained by completing Achievements. Make sure to check out your Missions to see what needs to be done to obtain these. More methods for obtaining Nekia Medals will be added in the future.
To access the Nekia Item Exchange, go to Zone -< click on the circular Search icon on the bottom middle of your screen – Item Exchange.
That’s it for this guide! We hope you were able to gain some insights into the vast and deep world of Mitrasphere.
If you have questions about the gameplay or are looking for players to group up with to tackle content, hop on over to the unofficial community Discord!
If you liked the article, do not forget to share it with your friends. Follow us on Google News too, click on the star and choose us from your favorites.
For forums sites go to Forum.BuradaBiliyorum.Com
If you want to read more anime-manga articles, you can visit our anime-manga category.